When writing a blog post, many people will sit for hours in front of their laptop or their computer and have no idea of what to write and where to start.
Does it sound familiar?
Because of this, there is a lot of time wasted when writing a blog post and I want to help you optimize the way you use your blogging time.

Planning is always the best way to go about things and I can help you plan your blog the best I can.
Follow the rest of this guide to find out where to start and how to write an awesome blog post.
You won’t regret it!
Table of Contents
Step 1: Choose A Topic For Your Blog Post
In this guide, I’m assuming that you have already selected the niche for your blog post.
So, now it’s time to select a topic for your next blog post or article.
The easiest way to write a blog post that flows well and actually sounds like you care about is to choose a topic you are interested in.
This way, you’ll be a lot more knowledgeable about the topic and you’ll find writing a lot easier than if it was about a topic you were not passionate about.
But, there are so many different topics to choose from…
So, how can you pick one topic that has the potential to generate traffic long-term?
How can you invest your time in writing a post that will give you a good return on investment based on the time you spend writing it?
To select a topic for your blog post that people are searching for you can use SEO marketing tools like Ahrefs that provide Competition and Monthly Volume data for each Keyword. This will increase your confidence about the topic you select. It will also help you avoid topic that are extremely competitive.
Depending on how old your blog is you can choose to pick topic that are more or less competitive.
If you are just starting your blog, start with low competition topics even if they provide a lower monthly traffic.
Below you can see a screenshot from Ahrefs Keyword Explorer. It shows a list of low competition keywords (Keyword Difficulty is zero).
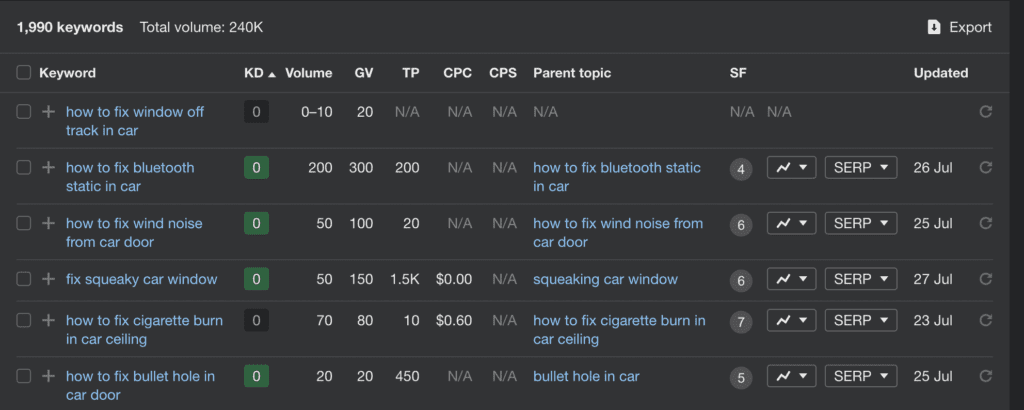
By using tools like Ahrefs choosing the primary keyword (or search phrase) for your blog post becomes a lot easier.
Step 2: Research About Your Topic Before Starting Writing
One of the biggest mistakes you could do after choosing a topic for your blog post is to start writing straight away.
Why?
Because it’s likely that you will start writing and then stop when you need to know more about the topic to continue writing.
So you might do a bit of research and then go back to writing until you are again out of ideas.
This back and forth can go on for a long time increasing the time you need to write a blog post.
So, what’s the alternative?
Once you select a topic for your blog post spend some time researching and learning as much as possible about the topic. In other words, become an expert on that specific topic by learning about it for 1 to 2 hours. Splitting research and writing time will make the writing process a lot easier.
If you don’t believe me try it yourself.
Step 3: Write A Basic Outline
Now that you have researched your topic you are ready to move to the next step…
There is a way to know roughly what your blog post will look like before you’ve written it, and that’s to make a basic outline.
From here, you can break your article down into separate headings and subheadings for what you want to talk about.
Nobody wants to sit there and read one massive paragraph because it would seem like reading an essay. There needs to be some sort of structure, or the blog post can look a bit intimidating.
It doesn’t have to be too detailed or complicated. Just enough for you to understand the direction you’ll be heading in.
Of course, from here you also have a rough idea of how long your blog post is going to be.
For example, you can set yourself a ‘budget’ so to speak, and assign yourself a rough number of words for each section. This will help you form a structure and work from there.
The research you have done in the previous step will also help you create the outline because you will clearly know the aspects of the topic to cover.

Step 5: Pick A Good Headline
For this step, you want to choose something short and snappy. Something that is bound to catch the eye of people looking for something to read.
You often see that many bloggers use clickbait as a tactic for getting views.
However, it can be a bit cheap and you should keep it interesting, rather than bending the truth for clicks.
After all, if you build yourself a reputation of clickbait for views, then you’re going to lose out in the long run.
What I suggest, is to find a key part of the article and highlight it in a few words by still keeping in mind the primary keyword (or search phrase) you have selected for your post.
For example, if you’re writing about dangerous sharks, then you could use a title like: “Sharks of The World – The Most Dangerous Species”.
It’s all down to your preference.

Step 6: Write The Article
This is the part where you get to see your creation come to life.
We all have different ways of working, which will vary from person to person. Just make sure you try to get some words on the page to ensure you’re making progress.
And avoid reviewing your blog posts while writing it. You will just waste lots of time going back and forth through your content.
Instead, write the first draft from beginning to end and once it’s done go back and review it.
Hint: When writing a blog post split the writing process from the review process.
Also…
Find a place where you don’t have distractions, a place where the only thing you think about is writing.
This is something I have discovered after months of blogging…
When I started blogging I was doing it from home, often in the same room where I work during the week. It wasn’t working well but it wasn’t immediately clear to me why.
After a while, I realized that my brain couldn’t focus on writing blog posts. And that was because it was associating the environment I was in at my daily job. That environment was also full of distractions (e.g. food and TV).
So, I started going to a cafe not far from where I live and that’s where the magic happened!
Suddenly I was able to focus on writing blog posts like never before. I would enter the cafe with a clear idea in mind and I would leave the cafe with the article published.
Fantastic!
The environment you choose where to write your blog posts has a huge impact on your productivity as a writer. Choose an environment without distractions and different from the place where you usually work.
Also, after writing and publishing lots of blog posts you might notice a decrease in motivation. It’s normal, after all we are human beings.
This is a sign that it might be time to have a break from writing. Make sure not to avoid burning yourself out.
At that point simply take a break for a few days. It will help you recharge and get back your excitement about writing.
Step 7: Edit Your Content
It can help get someone else to look over your work if possible because they will likely find spelling mistakes that you won’t.
If you’ve just been looking at the same page for 2 hours, then it’s likely you’re going to miss some stuff.
I understand that this is not always possible. In that case, I find that using a browser add-on like Grammarly is a great way to get some external help. And, it’s free!
From here, you just want to make sure the spelling and grammar are correct, so the blog post looks professional. Nobody wants to read something littered with spelling mistakes.
You also want to make sure the article flows well, with a few lines for each paragraph.
Hint: Avoid big paragraphs of text. They will make your blog post harder to read especially nowadays that most people use their phones.
From here, you can consider adding some final touches like pictures, before uploading your work for all to see!
Conclusion
A lot of different stages are part of the process of writing a blog post. You just need to do your best to break the task at hand into smaller pieces.
Write a checklist if you have to!
From here, you can tick off the different points and see some real progress as you go through your article.
At the end of the day, writing blog posts should be fun because you’re writing for other people to read your work!
I hope I’ve helped you take your first steps in the right direction.
I’m a blogger and entrepreneur. I want to help you in your journey to build your business online.